

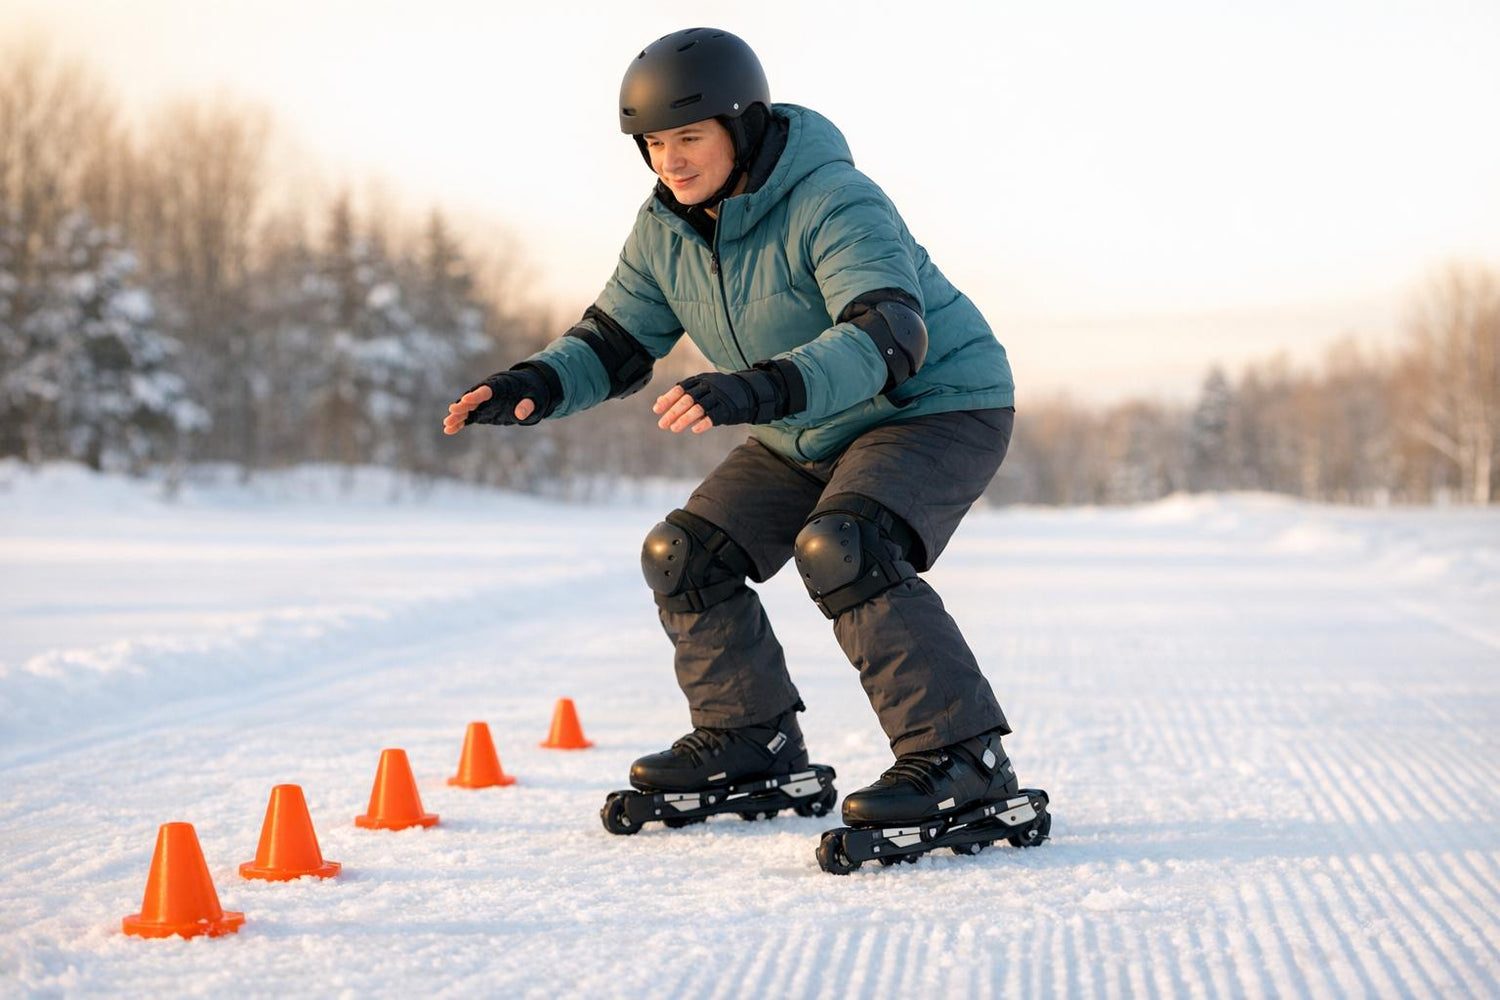
Skiskating is a fun winter sport that combines skiing and skating techniques, making it easier for beginners to learn. With short, compact skis called skiskates, you can glide smoothly and maintain better balance compared to longer skis. Here's a quick breakdown of what you need to know:
- Why Skiskates? They’re lightweight, portable, and work with regular ski or snowboard boots, so no extra gear is needed.
- Gear Tips: Start with beginner-friendly models like the Snowfeet Basic ($190) or Skiskates Ski Boots Model ($490). Don’t forget safety essentials like a helmet, wrist guards, and waterproof gloves.
- Learning Basics: Focus on an athletic stance - knees bent, weight on the balls of your feet, and hips forward. Avoid leaning back to maintain control.
- Practice Drills: Start with simple exercises like the Split Skate Drill and Waddle Skate Drill to improve balance and weight shifting.
- Routine: Dedicate 20–30 minutes per session, 3–4 times a week, to build confidence and skills.
Skiskating is not about perfecting every move - it’s about enjoying the snow while learning step by step. With consistent practice, you’ll be gliding smoothly in no time.
What Are Skiskates and Why Use Them
What Are Skiskates?
Skiskates are compact skis that blend the techniques of skiing and skating, offering an easy and fun way to enjoy snow sports. Unlike traditional skis, which can be long and harder to handle, skiskates are much shorter - typically measuring between 26 and 39 inches. This smaller size makes them more manageable and ideal for quick turns and movements. Plus, they work with standard ski or snowboard boots, so there’s no need to buy special footwear. Whether you’re gliding down groomed slopes, navigating snow parks, or exploring hiking trails, skiskates are a versatile option for winter adventures.
Main Features of Skiskates
Skiskates are all about convenience and performance. Here’s what makes them stand out:
- Adjustable bindings: They come with tool-free bindings that fit a variety of boot sizes, making them easy to use for different people.
- Portability: Their small size means they can fit into a regular backpack, so carrying them around is a breeze.
- Durability and performance: Built in Europe, they feature a sustainable wood core for flexibility and responsiveness. Steel edges provide extra grip on icy surfaces, while their sturdy cap construction ensures they hold up over time.
- Lightweight design: This reduces fatigue, especially during longer practice sessions, making them a great choice for both beginners and experienced users.
These features combine to create a piece of equipment that’s easy to use, long-lasting, and effective on various types of terrain.
Why Skiskates Work for Beginners
Skiskates are particularly beginner-friendly thanks to their thoughtful design. Their shorter length reduces the chances of catching edges or losing balance, which can be common challenges for newcomers. This compact size also encourages a natural, athletic stance, where users bend their ankles, knees, and hips for better weight distribution and smoother movements. By offering more stability and control, skiskates help beginners build confidence and learn the basics faster, making them an excellent entry point into the world of snow sports.
sbb-itb-32287b2
Gear and Safety Tips for Skiskating
Skiskates Models for Beginners
Getting started with skiskating? Picking the right model can make all the difference. The Snowfeet Basic, priced at $190.00, is a great option for beginners. It’s simple, affordable, and comes with adjustable bindings that work with both ski and snowboard boots. This setup provides everything you need to master the basics without unnecessary complications.
If you’re looking for more support and plan to use traditional ski boots, consider the Skiskates Ski Boots Model for $490.00. This model is designed for compatibility with ski boots and offers enhanced stability with its adjustable, tool-free bindings. Both models are handmade in Europe, using durable materials and steel edges for dependable grip on various snow conditions.
Once you’ve chosen your skiskates, make sure you’re equipped with the right safety gear to start your journey confidently.
Safety Equipment You Need
Safety should always come first. Start with a helmet that’s either skating-rated or equipped with MIPS protection. A well-fitted helmet (level on your head with straps forming a "V" under each ear) can significantly reduce the risk of head injuries.
Wrist guards with rigid splints are a must, as forward falls are common for beginners. Add low-profile knee pads with shock-absorbing foam, and consider elbow or hip pads for added protection. For clear vision and a secure grip, use antifog goggles and waterproof gloves with grippy palms - Gore-Tex gloves are a great choice.
Before hitting the snow, test your gear by practicing falling positions on dry land. Squat down and bend your elbows to ensure your pads stay in place. Also, avoid wearing cotton as your base layer - it traps moisture. Opt for synthetic blends or merino wool for moisture-wicking properties, add a fleece mid-layer for warmth, and finish with a wind-resistant, waterproof outer layer.
Boots That Work with Skiskates
The right boots are essential for maintaining control and balance. Skiskates come with adjustable bindings that fit both standard ski boots and snowboard boots, giving you flexibility in your choice of footwear. The key is finding boots that hold your heel securely, support your ankle firmly, and keep your toes comfortable. A snug fit translates to better control on the snow.
For beginners, boots like the Atomic Hawx Prime 80 are a solid choice, offering a good balance of comfort and support. Ensure your boots fit properly and adjust the bindings to match. A well-fitted boot can make learning much easier - and safer - on the slopes.
How to Balance and Position Your Body
The Athletic Stance
To achieve the Athletic Stance, start by bending your knees and leaning forward, almost as if you’re landing from a jump. Your knees, hips, and ankles should work together, creating a slight forward tilt in your shins. This helps center your weight under the balls of your feet, just behind your toes. Extend your arms out at waist level for extra stability, and keep your feet about hip-width apart (roughly 4–6 inches). Skating expert Lasse Lyck emphasizes this point:
The point of balance should be exactly under the balls of your feet just behind the toes.
Avoid the common mistake of leaning back on your heels, as it leads to a loss of control. Instead, lean forward so that your nose, knee, and skate tip form a vertical line. Your shoulders should remain squared over the active skate. As Level 2 TrainingPeaks Coach Carrie McCusker explains:
A stiff, upright skier falls easily while a relaxed, poised skier absorbs terrain changes with less issue.
Drills to Improve Balance
After mastering the stance, reinforce it with specific drills. One effective exercise is to jump and land softly, ensuring your feet hit the ground first while your knees absorb the impact. This helps you naturally settle into the target stance.
Another helpful drill involves shifting your weight from one foot to the other. Use a rocking motion initiated by your hips rather than just your knees. For a simpler option, stand with your skates in a "V" shape and press your knees toward the skate tips. This shifts your hips forward and transfers weight to the balls of your feet.
To further refine your balance, try coasting on flat terrain while repeatedly lowering and raising your hips. This improves joint flexibility and enhances your ability to maintain balance. Keep your eyes focused ahead on the trail - looking down can throw off your balance and disrupt forward momentum.
Practice Drills for Beginners
Split Skate Drill
Begin on flat, groomed terrain with your skis in a V-shape. Stand in an athletic stance: knees bent, weight evenly distributed, and your body leaning slightly forward toward the tips of your skis. Shift your weight onto the balls of your feet for better control. Charlotte Ogden, a Bivo Team Member, emphasizes:
"The key to skate skiing fast is preserving your forward momentum and letting gravity do all of the work for you, even if you are heading up a hill. To do this, you've got to bend at the ankles and knees to get your hips forward."
Lean forward with your hips and upper body. As your hips move forward, your skis will naturally slide apart. Once you’ve reached the maximum glide, hop or step one ski back to the center, returning to the starting V-position, and repeat the motion. Keep your shoulders aligned over the gliding ski for better balance. Instead of pressing through the ball of your foot, focus on applying pressure to the inner edge for a smoother push. To start, practice without poles to focus on mastering the balance and glide motion.
Waddle Skate Drill
Building on the balance you’ve developed in the Split Skate Drill, this exercise adds lateral movement. Begin in the same V-position and use your hips to rock side to side, shifting your weight from foot to foot, rather than relying entirely on your knees. As you transfer weight to one ski, let the other ski lift and glide outward. The motion should feel like a smooth, controlled waddle, similar to a speed skater. Aim to generate about 60% of your propulsion from your legs during this drill. Keep your ankles, knees, and hips softly flexed to lower your center of mass, which helps with stability. Experiment with varying step sizes and tempos to find the rhythm that provides the best glide with minimal effort.
Zigzag Knee Bend Drill
After mastering the side-to-side glide, incorporate poles into your routine to improve coordination. Start in the V-position and continue the side-to-side motion, but now add pole engagement. Plant both poles at the same time and use a core compression or "crunch" motion to power your stroke. As Snow Trace explains:
"Power comes from core compression, not just arms."
Follow a deliberate rhythm: plant the poles, crunch your core, push through the stroke, and return to an upright position. With each glide, press your knees forward to ensure proper weight transfer. Begin practicing this drill in slow motion to exaggerate the knee bend and refine your form. Once you’re comfortable, gradually increase your speed. Keep your gaze focused on the trail ahead, not your feet, to maintain balance and awareness. This drill ties together the foundational skills, preparing you for more advanced techniques.
20-30 Minute Practice Routine
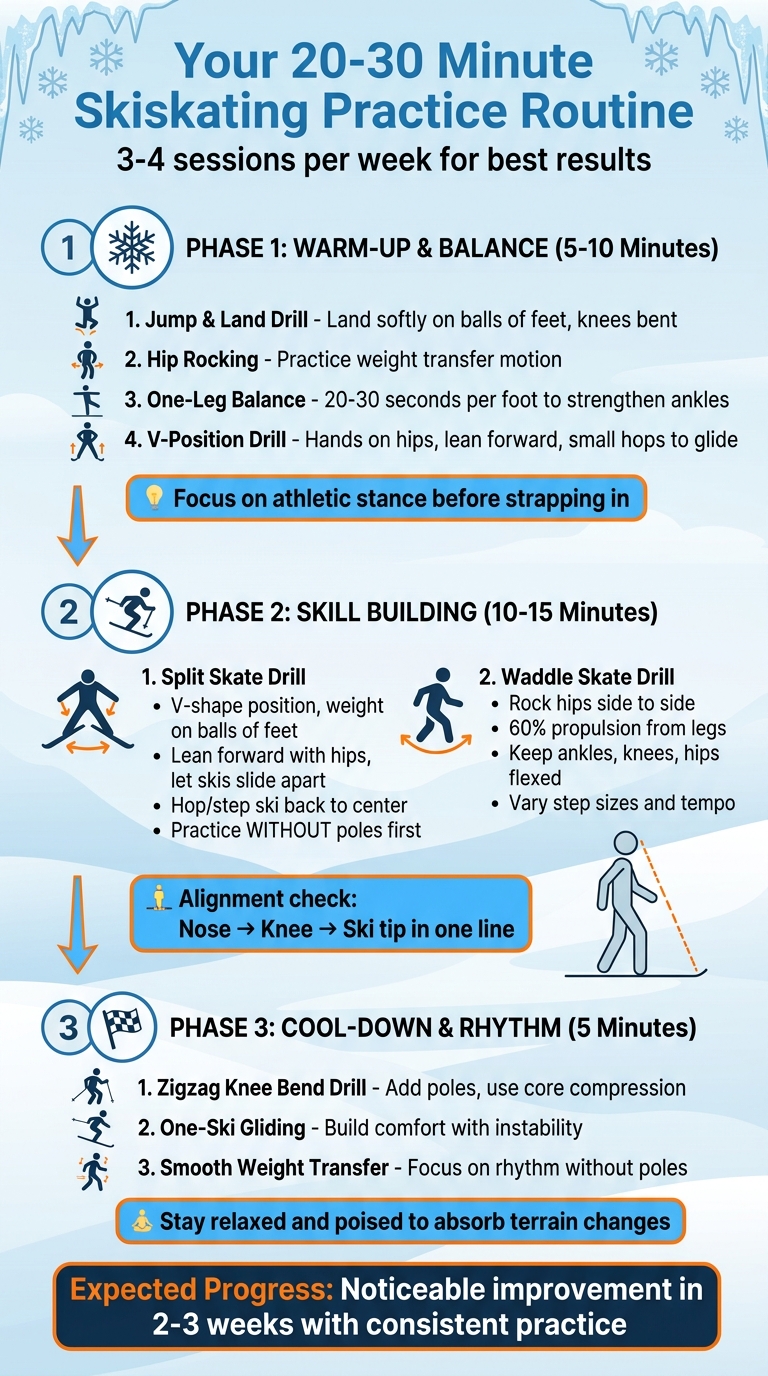
Beginner's 20-30 Minute Skiskating Practice Routine with Drills
This routine focuses on improving balance and control, building on the fundamentals discussed earlier. Carrie McCusker, a Level 2 TrainingPeaks Coach, highlights that "beginning without poles and understanding how to glide efficiently will lead to skiing with less resistance and more speed". The following three-phase routine combines balance exercises, movement drills, and rhythm work into a 20–30 minute session you can repeat several times a week. It’s designed to reinforce the glide and balance techniques previously introduced.
Warm-Up and Balance (5–10 Minutes)
Start off your skiskates with a simple drill: jump and land softly on the balls of your feet, keeping your knees bent. This helps you find the natural athletic stance needed on snow. Next, practice a gentle rocking motion from hip to hip to get a feel for weight transfer before strapping into your skiskates. Once you’re ready, move to flat terrain and try standing on one leg for 20–30 seconds on each foot, which strengthens your ankles. Wrap up the warm-up with the V-position drill: place your hands on your hips, lean your upper body forward, and use small hops to glide upward, focusing on driving your hips forward.
Skill Building (10–15 Minutes)
Now, revisit the Split Skate Drill and Waddle Skate Drill. Pay close attention to the alignment tip McCusker shares: "Your goal is to line up your nose, knee, and the tip of your ski in one line, with your shoulders squared over the ski". If you’re on a gentle hill, get into the V-position, lean forward to initiate movement, and use small hops to recenter your skis. Keep your gaze forward instead of looking down at your feet - this helps maintain better posture and balance.
Cool-Down and Rhythm (5 Minutes)
After working through the drills, transition into a cool-down that reinforces rhythm and balance. Practice without poles to focus on smooth weight transfer. Incorporate the Zigzag Knee Bend Drill, which improves timing and edging power while keeping your upper body steady. Work on gliding on one ski to get more comfortable with slight instability. As McCusker explains, "a stiff, upright skier falls easily while a relaxed, poised skier absorbs terrain changes with less issue". This cool-down phase helps solidify the skills you’ve practiced and sets the stage for your next session.
Conclusion
Mastering skiskating starts with a few key basics: keeping an athletic stance with your hips forward and improving balance through steady weight shifts. Skiskates are designed with beginners in mind, offering a lightweight and compact platform that helps build muscle memory for smoother turns.
The drills in this guide - like the Split Skate and the Zigzag Knee Bend - break down complex movements into simple, actionable steps. For beginners, committing to three or four practice sessions a week often leads to noticeable progress within two to three weeks.
Keep in mind that technique takes time to develop, and it's okay if you're not perfect right away. As Charlotte Ogden wisely puts it:
Just getting outside and having fun is always more important than having perfect technique.
Focus on maintaining forward momentum and letting gravity lend a hand, especially on gentle slopes.
FAQs
Where should beginners practice skiskating first?
Beginners looking to try skiskating should consider starting at indoor ice rinks or joining beginner classes at skating academies. Indoor rinks are perfect for learning since they offer a consistent, controlled environment where you can practice no matter the season or weather conditions. Signing up for beginner-focused programs can help you develop essential skills and gain confidence in a supportive and structured atmosphere.
Do I need poles to start skiskating?
Poles aren’t a must-have for beginners learning skiskating. The initial focus should be on getting the basics right - like balance, proper body positioning, and smooth movement patterns. Once you feel more confident and your skills improve, you can think about incorporating poles into your practice. But at the start, they’re not essential.
How do I slow down or stop on skiskates?
To slow down or stop while using skiskates, beginners can try the snowplow stop. This involves bending your knees, leaning back slightly, and angling both skates sideways at about 45 degrees, keeping the blades parallel to each other. For those with more experience, the hockey stop offers a faster way to halt. This advanced technique demands solid balance and precise control. Both methods rely on steady, deliberate movements to help you reduce speed and stay stable.

Leave a comment
This site is protected by hCaptcha and the hCaptcha Privacy Policy and Terms of Service apply.