
If you're an inline skater looking to stay active during snowy winters, skiskating might be your perfect solution. Skiskates, compact skis ranging from 28 to 35 inches, let you transfer your skating skills - like balance, weight shifts, and forward strides - directly to snow. With minimal adjustments, you can glide through winter trails without starting from scratch.
Here’s what you need to know:
- Skills Transfer: About 80% of your skating techniques, like edge control and crossovers, apply to skiskating.
- Gear Options: Beginner-friendly skiskates start at $190, while advanced models go up to $490.
- Practice Tips: Start on flat terrain to build confidence, then progress to hills and snow parks.
- Core Strength: Simple exercises like planks and side planks improve stability on snow.
- Winter Prep: Dress in layers for 20–30°F weather, focusing on moisture-wicking and insulated materials.
Ready to start? Grab your skiskates, hit a snowy field, and enjoy a new way to glide through winter.
How Inline Skating Skills Apply to Skiskating
Making the leap from inline skating to skiskating is easier than you might think. The fundamental skills are already in your toolbox. Balance, edge control, and weight distribution work in remarkably similar ways. When you tilt your inline skates onto their inside edges to carve a turn, you're mirroring the same motion needed on snow. The key difference? Instead of wheels gripping pavement, skiskates rely on their edges to interact with the snow. These familiar movements create a solid foundation for safe and effective skiskating.
Movement and Balance Basics
That wide A-frame stance you rely on for stability while inline skating? It works just as well on snow. Weight distribution follows a similar principle: shift your weight onto your support leg - usually the uphill or trailing leg during a turn - while the other leg pivots or glides. Keeping your gaze focused on your target naturally helps rotate your hips and subtly adjust your weight, allowing for smooth, controlled turns.
Adapting Forward Strides and Crossovers
Your forward stride doesn’t need much tweaking for skiskating. Inline skating instructor Liz Miller describes the propulsion technique as pushing "against the left skate's inside edges to add momentum to your glide". On snow, the same push-and-glide motion keeps you moving efficiently.
Crossovers translate directly into carving turns. Miller breaks it down as a "one-two action with the right skate: CARVE, then GLIDE". During the carve phase, you use your inside edge to steer, then shift to a neutral stance during the glide phase to maintain forward momentum. If you lose control and start to spin, simply bring your skiskates parallel and upright to regain balance.
With these adjustments, you're well on your way to mastering skiskating and can now dive into finding the right gear to get started.
sbb-itb-32287b2
Skiskates Equipment for Beginners
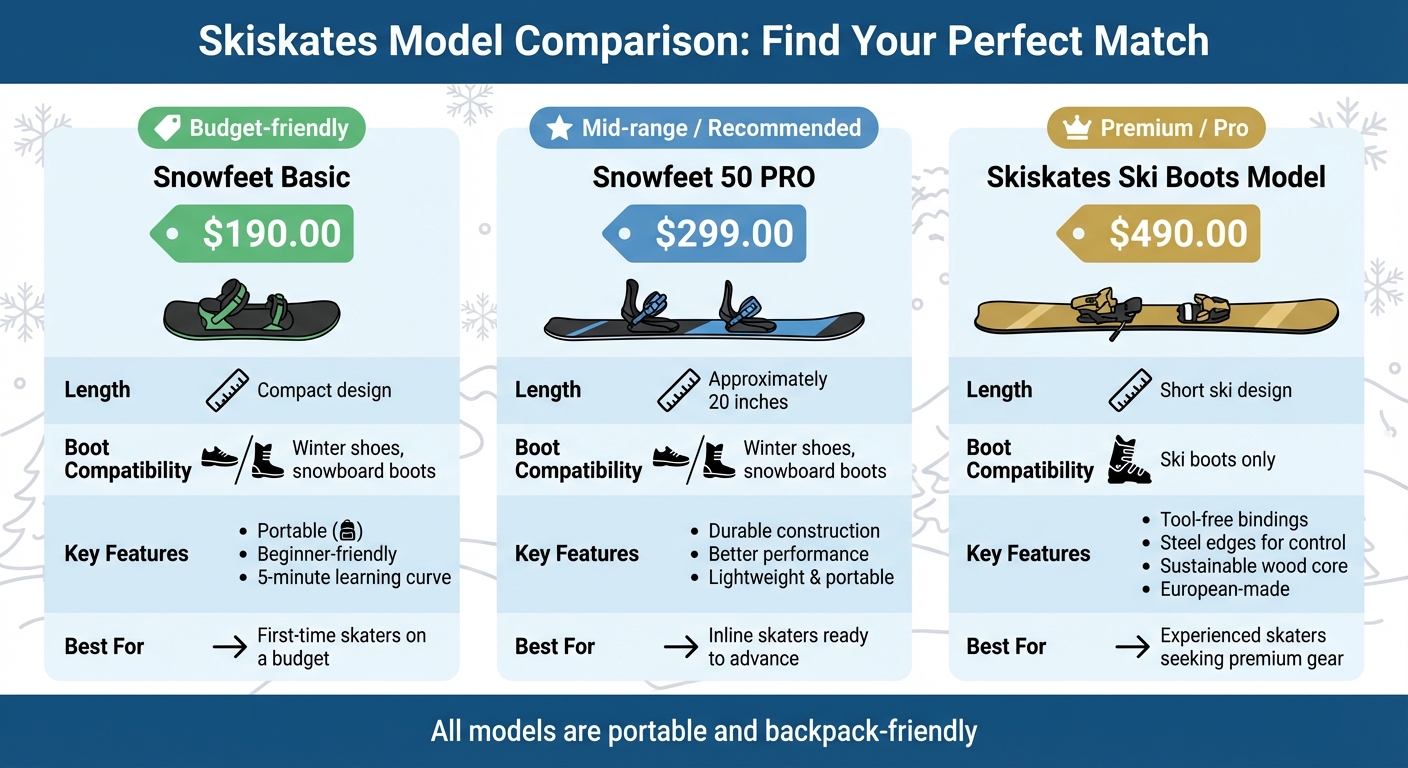
Skiskates Equipment Comparison Guide for Inline Skaters
Best Models for Starting Out
Once you've adjusted your skating skills to snowy terrain, it's time to focus on picking the right gear. Luckily, choosing your first pair of skiskates doesn't have to be overwhelming. A great starting option is the Snowfeet Basic. At $190.00, it's a budget-friendly choice for beginners. These compact mini ski skates are easy to carry in a backpack and work with standard winter shoes. If you have some inline skating experience, you’ll likely pick up the basics in just 5 minutes. That quick learning curve can help you feel comfortable on the snow almost immediately.
For those aiming for better performance, the Snowfeet 50 PRO, priced at $299.00, is a step up. It offers added durability and handles a variety of snow conditions while still being lightweight and portable - two features that make skiskating so enjoyable.
If you're an experienced skater looking for top-tier equipment, the Skiskates Ski Boots Model might be your best bet. At $490.00, it’s designed with professional-grade materials, including adjustable, tool-free bindings for ski boots, a handmade sustainable wood core, and steel edges for better control. Despite its advanced construction, it remains lightweight and portable enough to fit in a backpack.
The table below provides a quick comparison of these models:
Skiskates Model Comparison Table
| Model | Price | Length | Boot Compatibility | Key Features | Best For |
|---|---|---|---|---|---|
| Snowfeet Basic | $190.00 | Compact | Winter shoes, snowboard boots | Portable, beginner-friendly, easy to use | First-time skaters on a budget |
| Snowfeet 50 PRO | $299.00 | Approximately 20 in. | Winter shoes, snowboard boots | Durable, better performance | Inline skaters ready to advance |
| Skiskates Ski Boots Model | $490.00 | Short ski design | Ski boots only | Tool-free bindings, steel edges, European-made | Experienced skaters seeking premium gear |
Each of these models offers a chance to build confidence on the snow, whether you're just starting out or ready to upgrade to high-end equipment.
Converting Your Techniques from Pavement to Snow
If you've mastered balance and control on inline skates, you're already a step ahead when transitioning to snow. But here's the catch: snow introduces a whole new set of challenges. Its slippery, variable surface activates stabilizing muscles you might not have relied on before. Expect your shins and calves to feel sore in those early weeks - it's all part of the process as your body adapts to these new demands. While your core balance skills will serve you well, snow requires an extra focus on dynamic weight transfer. To stay stable, you'll need to concentrate on "getting over the ski" for a smooth glide. With that in mind, let's dive into some drills to help you master flat terrain before moving on to hills.
Flat Terrain Glides
Start on flat, groomed snow to get a feel for how your body interacts with this new surface. Shift your weight from one ski to the other by rocking your hips. At the same time, press your knees slightly forward toward the tips of your skis, keeping your weight centered on the balls of your feet. Professional skier Hannah Rudd suggests practicing without poles for better weight transfer:
For skate, no pole skiing can help with weight transfer and remembering how to glide confidently on snow.
This approach forces you to trust your edges and build confidence without relying on poles for stability. Another great exercise is the V4 skate drill, where you glide and use your poles alternately on each side. Rudd explains the benefits:
The V4 drill is great for balance, creating a tall, powerful body position, and for getting over your ski.
Braking and Turning on Hills
Hills bring their own set of challenges, so staying relaxed is key. Keep your knees soft to absorb changes in snow density and incline. A stiff posture increases the risk of falls, while a flexible, poised stance helps you adapt to the terrain. For better control, align your nose, knee, and the tip of your ski in a straight vertical line with your shoulders squared. A helpful exercise is the soft-landing drill: jump lightly and land with your weight centered over the balls of your feet and your knees naturally bent. This same position is your go-to when gliding downhill.
Developing Edge Control
Edge control on snow builds on the precision you developed with inline skating crossovers, but it requires more deliberate ankle stability and pressure. Tilting your ski to engage either the inside or outside edge is the key here. Snow demands consistent pressure through your ankles, so choosing boots with solid ankle support is crucial. This keeps your skis aligned and prevents your foot from tilting inward, ensuring your ski acts as an extension of your leg. To strengthen this skill, practice dorsiflexion by leaning your shin forward into a deep squat. This shifts your center of mass over the ball of your foot, giving you better control and power. For extra feedback, record yourself practicing on various terrain types. Watching your form can reveal areas where adjustments are needed. With solid edge control, you'll be ready to take on more advanced snowy landscapes.
Maintaining Balance and Control in Cold Weather
Cold temperatures can slow down muscle warm-up, delay reaction times, and make it harder to adjust your balance. To stay in control, focus on adjusting your stance, building core strength, and dressing smart for the weather. These steps will help you stay steady and prepared for winter's challenges.
Adjusting Your Stance for Snow and Ice
Snow and ice bring unpredictable surfaces, requiring constant adjustments to your posture. Start by bending your knees slightly to lower your center of gravity, which helps you absorb sudden changes in terrain. Keep your shoulders relaxed to avoid tension, and align your hips over your feet for better stability. This athletic posture acts like a built-in shock absorber, making it easier to adapt to slick or uneven surfaces.
Core Strength and Stability Exercises
Your core plays a crucial role in connecting your upper and lower body, ensuring smoother movements and better balance. A strong core is especially important when navigating slippery conditions during pushes, glides, stops, and turns. The good news? With consistent effort, you can start noticing improvements in just 2–4 weeks, and many core exercises don't require any equipment. Aim to train your core 3–5 times a week for the best results.
Here are some effective exercises to get started:
- Planks: Help maintain upright posture during glides.
- Bird Dog: Builds stability on one foot, which is key for balancing on edges.
- Dead Bug: Targets deep abdominal muscles to keep your torso steady as your limbs move.
Begin with 3 sets of 20-second planks, 3 sets of 10 Bird Dogs per side, and 3 sets of 10 Dead Bugs. Once you're comfortable, add Russian Twists (3 sets of 20) to improve rotational control for turns, and Side Planks (3 sets of 30 seconds) to develop lateral strength for smoother transitions. Always warm up beforehand and prioritize proper form over speed to avoid injury.
While strengthening your core, dressing appropriately for the cold ensures you stay nimble and responsive.
Dressing for Winter Weather
The right clothing can make or break your performance in winter conditions. Start with a moisture-wicking base layer to keep sweat off your skin - avoid cotton, as it traps moisture and makes you colder. Add an insulating mid-layer, like fleece or synthetic fill, for warmth. Top it off with a windproof and waterproof outer shell to block out the elements.
Since extremities lose heat quickly, invest in insulated gloves and thermal socks designed for winter activities. A neck gaiter or balaclava can shield your face from the wind while allowing free movement. Be careful not to overdress - if you're sweating heavily within the first 10 minutes, you may need to remove a layer. The goal is to stay warm enough to keep your muscles responsive without overheating, which can lead to fatigue and impact your balance.
Step-by-Step Practice Progression
Developing your skiskating skills takes time and a well-thought-out approach. Start on flat, easy terrain where you can focus on mastering balance and basic movements without worrying about speed or slopes. Once you’re comfortable gliding and controlling your edges, gradually move on to hills and more challenging conditions. This step-by-step progression not only builds your confidence but also reduces the chances of falls or injuries.
Beginning on Flat Fields
Start practicing on flat, compact snow surfaces like open fields or gentle trails. Begin with the Single-stroke (V2) technique, which involves double-poling with every step. This helps you work on balancing while gliding on one ski at a time. If you’ve tried inline skating crossovers before, this movement should feel somewhat familiar - it’s all about shifting your weight from side to side while maintaining forward motion.
If balancing proves tricky at first, try the Siitonen step. This half-skate method keeps one ski in a straight track for stability while you push off with the other. Focus on applying full edge pressure and aligning your center of gravity with each push. Stick to flat terrain until you’ve nailed your balance, then move on to inclines.
Moving to Hills and Snow Parks
Once you’ve refined your skills on flat terrain, you’re ready to tackle gentle slopes and dynamic snow parks. On inclines, you’ll need to adapt your technique to account for asymmetry. For mild climbs, use the Guide arm technique (V1), which involves double-poling every second step to provide asymmetrical propulsion. For steeper slopes where gliding becomes harder, switch to Diagonal skating, alternating pole usage for better control. Don’t forget to alternate your leading side regularly, as the leading arm absorbs about 20% more force.
When heading downhill, adopt a Free Skate stance by pulling your poles close to your body and bending your knees into a low squat. This position reduces drag and lowers your center of gravity, giving you more stability at higher speeds. To manage your speed, use the snowplough (or “pizza”) technique. The secure fit of Skiskates makes this maneuver easier to execute.
As your confidence grows, you might consider upgrading your gear. Models like the Snowfeet Skiblades 65 CM ($550.00) or 99 CM ($590.00) offer longer designs and steel edges, providing enhanced stability and control. These features are perfect for advanced moves like spins, jumps, and tricks in snow parks.
Conclusion
You're all set - embrace winter with your skiskates. Your inline skating background gives you a strong foundation for balance, strides, and crossovers, which easily carry over to the snow. From choosing beginner-friendly gear to mastering flat glides and edge control, this guide provides the tools you need to make the shift both smooth and enjoyable. With focused drills and steady practice, you'll refine these skills and be ready for snowy adventures.
Winter sports coaches highlight that skiskating can cut the learning curve for inline skaters by 50%, thanks to the similar posture and weight-shifting techniques. Whether you're working on flat glides or tackling gentle slopes, your progress is within reach.
Start small: grab your skiskates, head to a local flat area this weekend, and practice those basic glides. Dress warmly for 20–30°F weather, concentrate on core stability, and gradually move on to gentle slopes. From pavement to snow, you're ready to turn winter into your playground. Lace up, hit the snow, and let your winter adventure begin!
FAQs
Do I need poles to start skiskating?
No, you don’t need poles to start skiskating. The technique is much like ice hockey skating, where the emphasis is on edge control and maintaining balance. These skills can be practiced effectively without poles. Beginners can jump into skiskating without poles and decide to incorporate them later if they feel it’s necessary.
What kind of snow is best for beginners?
Soft, powdery snow is perfect for beginners because it provides a gentler surface to practice on. Its cushioning effect helps soften falls, making the learning process less intimidating. Plus, it offers better control, giving newcomers a forgiving environment to master basic snow skating moves.
How do I choose the right boot setup?
Choosing the right boots is all about finding a setup that delivers stability, control, and comfort for the shift from inline skating to snow. Make sure the boots fit snugly, offer solid ankle support, and work seamlessly with your skis or bindings. It's also important to focus on features designed for cold weather and a secure fit to help you stay balanced and in control. For the best results, consider visiting a specialty shop where experts can guide you to the perfect pair.
Leave a comment
This site is protected by hCaptcha and the hCaptcha Privacy Policy and Terms of Service apply.